
How to replace or repair caulk from shower
Knowing When to Replace or Repair
No matter how good the caulk between your shower tile and bathtub may look today there will come a point when it becomes infested with mildew, drenched with water, or having a cracking appearance. When this happens, it does not matter how much bleach or special chemicals you use in certain areas in your shower tile it will be hard to get the original look.
This is because the damage to the old sealing material in the shower tile may have moved to areas behind the tile itself and along the bath tub or other specific areas. The faster you deal with this, the less expenses and time you will have when removing the old sealant from your bathroom shower tile.
Read more: The Crazy Things That Get Stuck in Your Toilet
Locate the Damaged Sealant
If you are a first time DIYer, then you may be wondering what exactly is caulk and how may I differentiate it from the grout in my shower tile? Caulking is usually placed in areas that have movements or water exposure. These areas usually include the meeting point between your bath tub and shower tile, floor and wall tile/ shower tile or the inside corner where two shower walls meet together.
This sealing material can also be found around plumbing faucets and valves. Grout on the other hand is used to fill the space between bathroom shower tiles and other tiles. In short, it is the finishing touch after you laid tile in your bathroom shower, walls, and floors.
Determine the Type of Waterproof Filler Used
The main types of watertight coatings that are used in bathrooms are silicone sealant and latex/acrylic latex caulk. Both types require different removal procedures, so knowing which sealer was used between your shower tile and bathtub or any other bathroom area for that matter will make the removal process a lot easier. You will also need to use the same type of caulking that you used after your shower tiling.
Read more: Troubleshooting Toilet Flush Problems 101
Remove the old Sealing Material
As mentioned earlier the removal process for different types of sealant will vary. The water based latex caulk/acrylic latex caulk requires heat to be removed and you can easily achieve this by using a heat gun to soften the caulk that is located between your shower tile and tub or any other area. You should take care not to apply too much as this can burn the sealant and even crack the shower tile in the process.
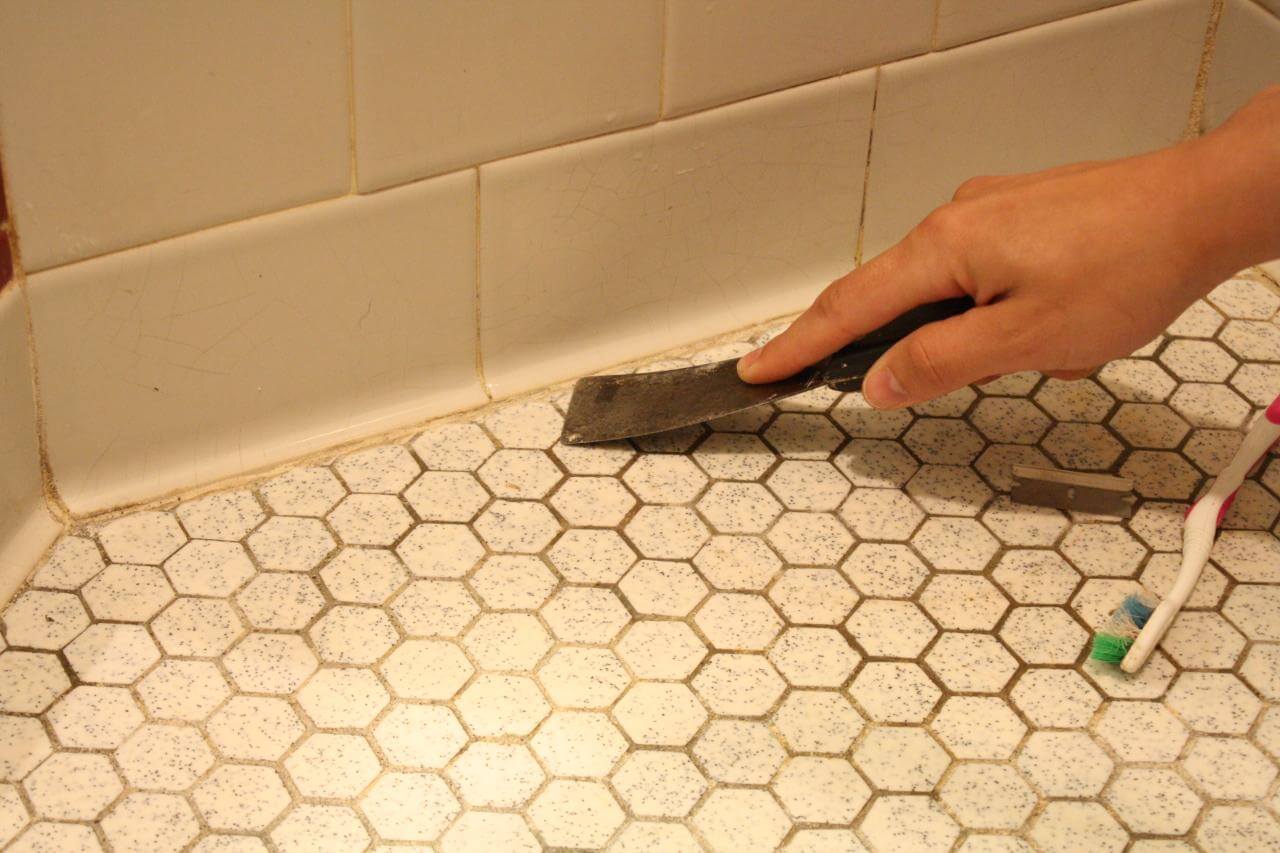
Silicone caulk on the other hand can be removed by using the blunt end of a knife to dig if out. If you find that this is not working then you may try a sharper knife or razor taking care not to scratch the surface between the shower tile and tub or other affected areas.
Recapturing Your Tiles Original Lustre
Grout restoration is a task that most first time bath renovators’ dread. The unsightly appearance of cracking grout or mortar that is full of dirt and mildew can cause any homeowner to stare in despair and disbelief. Luckily, depending on the problem you are facing with your bath there are a number of refurbishment recommendations that you can be used to make it sparkling new again.
In many instances, these methods only require proper cleaning to capture the original appearance of your grout. In other instances, you will have to use repair techniques by removing old mortar and replacing it with new grout and sealant once more. While most homeowners dread the thought of the work involved that requires replacing grout, in many cases, it is the best solution for unsightly tiles. Below you will find a list of techniques that you can apply in your bath to make it beautiful and clean again.
Read more: Unclogging Drains in Your Bathroom
Clean the Mortar
The first thing that should be done when you are considering grout restoration is cleaning your tile floors or walls. By cleaning the mortar lines with specially made solutions you will be able to evaluate the extent to which your grout can be repaired without resorting to removing it altogether. You may use acid-based cleaners, oxygen bleach, or even hydrogen peroxide in cleaning grout.
These are very strong chemicals, so always remember to protect your hands by using gloves. Once you have applied these chemicals then allow a few hours to pass before you arrive at a conclusion about the result. You may try reapplying the chemical you used once again to see if the stain, mildew or dirt is lessened or removed.
Coloring the Compound
If you find that the grout is not cracked, but discolored then you may want to try coloring the mortar by first learning about these color grout fundamentals. Coloring the grout is an easy process that involves using colorant in areas where the grout has been applied.
However, you will need to determine the type of grout that you have before you consider using this method. If you have unsanded grout then the best advice will be to remove it altogether. However, if you find you have sanded grout then you can easily use a grout colorant as was mentioned earlier.
Try to select a colorant that will complement the original look of your bathroom or create a new personalized look that you are satisfied with. You can try using the colorant on a small area to see how it blends with the tiles and faucets that are already in the bathroom.
Read more: How to solder copper pipe with water in it
Another useful tip to bear in mind when considering staining techniques would be to use masking tape along the end of each tile. This will prevent you from discoloring the tile in the process and make it a lot easier to color along the line of the joints. Always ensure that the surfaces you are coloring is clean and also intact. Broken and old mortar should be removed and not colored.